Choosing A Bathroom That's Built To Last
Why Discerning Homeowners Choose Tile Over Plastic or Linoleum Panels
Homeowners who take the time to look beyond the surface tend to arrive at the same conclusion: materials matter.
While plastic or linoleum panels may offer a quicker, lower-friction installation upfront, they always fall short in durability, appearance, and long-term value.
Tile (ceramic, stone or porcelain), on the other hand, delivers a more solid, refined finish that stands up to daily use and maintains its appeal over time.
Also, it’s a process that has been proven to be effective for centuries.
For those who value lasting quality, thoughtful design, and a bathroom they won’t have to revisit in a few years, the choice becomes clear.
This page explains the full sequence from first contact to finished shower — what happens, in what order, and why each step is done the way it is.
Our process focuses on delivering a superior customer experience and couples it with a competent installation of proven materials.
Our Different Approach Is Designed Around You

Start with Clarity, not a Sales Pitch
Before anyone calls you or steps into your home, you can build a complete, itemized quote using our online quoting app. It walks you through each key decision—from layout and fixtures to finishes, safety features, and final details—with transparent, published pricing at every step. By the end, you have a real number based on real choices, not a vague estimate that doesn’t compare reliably against other quotes.
This approach is intentional. The typical model in this industry is built around the sale—an in-home visit focused on securing a commitment. Ours is built around giving you clarity first. You can explore options, understand costs, and decide if we’re the right fit before investing any more time.
We’ve also curated a selection of durable, well-designed products that balance performance and appearance, so you’re not left sorting through endless options. And if you have specific products in mind, we can incorporate those into your quote as well.
It’s a more straightforward, informed way to plan your project—and a clear example of how our process is designed around you.

Review and Compare With Confidence
Once you’ve built your quote, we encourage you to compare it—across contractors, materials, and price points. We state that openly because an informed comparison leads to better decisions.
What matters is understanding exactly what’s being offered. Our projects use real ceramic or stone tile, installed over a properly waterproofed system, with fixtures and doors sourced from established Canadian manufacturers. That’s a clear, verifiable standard.
If another quote is based on a different system—such as prefabricated wall panels installed over existing surfaces—then it represents a different approach, with different materials and a different long-term outcome. When the scope is clearly understood, the comparison becomes straightforward.
We don’t position alternatives as right or wrong. The choice comes down to what you value, and what you expect your bathroom to deliver over time. Our role is simply to give you the clarity to make that decision with confidence.
Confirm the Details—On Your Schedule
When your quote feels like a good fit, the next step is a measuring consultation to ensure everything works seamlessly within your space. You can schedule this by phone, email, or directly through our online calendar—whatever is most convenient.
This visit is where your project becomes precise. A qualified team member will take detailed measurements, document the space, review access points, and assess your plumbing configuration. We also confirm that the products you’ve selected are well-suited to your layout, making any necessary adjustments before moving forward.
We’ll walk through tile quantities, trim and grout selections, and provide guidance on trusted local suppliers, along with how delivery is coordinated. Any construction considerations that could affect scope or cost are identified early—so there are no surprises later.
Just as importantly, there’s still no obligation to proceed. You’ll have the information you need, the time to consider it, and a clear understanding of how we work. From the beginning, our process is designed to give you clarity first—so you can make the decision that’s right for you.
Clear Terms- No Surprises in Contract.
When you’re ready to proceed, everything is formalized clearly: your contract is signed and your deposit is submitted, all of which can be done online.
The agreement is comprehensive and specific—detailing your full scope of work, confirmed product selections, production timeline, payment terms, and warranty coverage. Nothing is left open to interpretation, and the warranty language is exactly as published on this website, with no hidden conditions.
From there, the process is structured to eliminate uncertainty. Once your start date is secured, you’ll receive a detailed pre-production checklist outlining exactly what needs to be selected, purchased, and prepared in advance. This includes tile quantities, supplier recommendations, grout and trim considerations, delivery coordination, and how to ready your space.
We also provide a step-by-step breakdown of the installation process in proper sequence, so you understand what will happen, when it will happen, and what to expect at each stage.
The goal is simple: minimize surprises, reduce risk, and ensure that every aspect of your project is planned, confirmed, and under control before work begins.
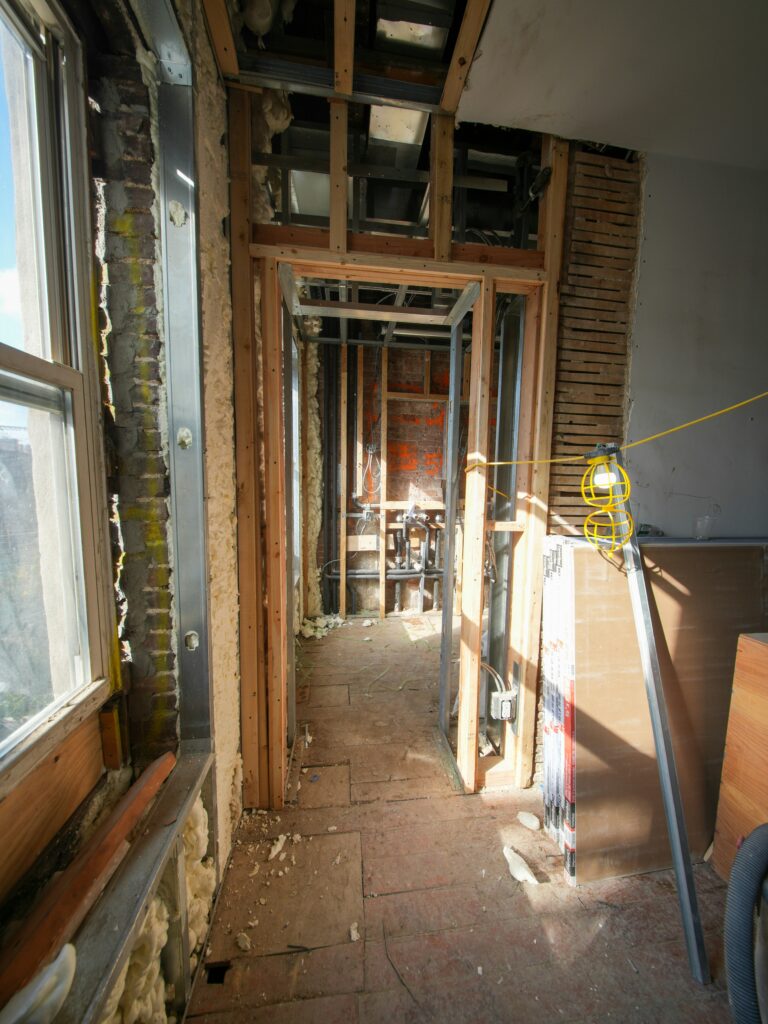
Day One: Demolition and Preparation
We arrive on schedule and begin by protecting your home—installing floor runners in all access areas, setting up dust control, and establishing proper ventilation.
From there, demolition is completed thoroughly, not selectively. The entire wet area is removed, including the existing tub or shower base, fixtures, wall materials, and the underlying substrate—right back to the studs. This allows us to start from a clean, known condition and build the space correctly from the ground up.
Working to the framing level ensures we can install proper substrate, add secure backing for grab bars, seating, and shampoo niche, and visually confirm that insulation and structural elements are in good condition. If anything requires attention, it is identified and addressed immediately—before new materials are installed.
This is a key point of difference. Alternative processes that install over existing tiled walls leave what’s behind the walls unseen and unchanged. By contrast, our approach removes that uncertainty entirely. You see exactly what’s there, and everything is brought up to standard before moving forward.
All demolition debris is removed from the property the same day, keeping the site clean and controlled.
Once demolition is complete, we inspect the framing, resolve any minor deficiencies, and begin rough-in. Drain locations, valve positions, and fixture placements are confirmed for accuracy. At the same time, all structural backing—for grab bars, seating, doors, and niches—is installed and documented, ensuring precise, secure installation in the finishing stages.

Built On A Proper Foundation
Once the space has been taken back to the studs, we install a cement-based tile backer board—a material specifically designed for wet environments. It does not swell, soften, or degrade with moisture, and it provides a stable, long-term foundation for the tile installation.
Over this surface, we apply a dedicated waterproofing membrane, selected based on the specific layout of your space. This membrane is applied continuously across all wall areas, including seams, corners, and penetrations, before any tile is installed.
This is where true waterproofing occurs. Tile and grout alone are not waterproof, and sealers are not designed to provide long-term protection. The membrane behind the tile is what prevents water from entering the wall cavity and is the system relied upon for decades of performance.
The visible caulking applied at corners and transitions is a finishing detail—a secondary layer of protection. In other systems, it often serves as the primary barrier. The difference is significant: one approach manages water at the surface, while the other controls it at the structural level.
It’s a choice between a system designed for long-term reliability and one that depends on ongoing maintenance.
Shower Base Installation
Neptune shower bases are manufactured in Canada from acrylic with reinforced construction.
They’re available in standard configurations — 60×30, 60×32, 48×36, 60×36 — with left drain, right drain, or centre drain options depending on your existing plumbing.
Any other of our bases (including the ones built from the ground up, using Schluter base pieces) are all attached to the floor and do not flex under the weight of humans. They’re all water-tight and built to accept water landing on them every single day, for decades. This is not new technology, but something that has been in the market for a long time and has been proven to be durable.
Installation involves setting the base level, connecting the base to the floor (and surrounding shower walls) connecting the drain assembly, and confirming a watertight seal at the connection point before tile work begins.
The base does not move. It does not flex under load in a way that compromises the seal.
This combination of features, combined properly, guarantees three decades of durability without a single page of warranty information being produced. It’s all verifiable and proven before the work has even begun. That’s the sort of warranting that we want to be associated with- the right combination that is affordable, but that lasts for decades with no issues at all. That’s the best we can do for our clients. If you’ll notice, there’s no “lifetime” warranty promise, no 1 or 2 day install promise needed. The process sells itself, to those who see the value in such an approach.
Fixture Installation: Rough-In Phase
Riobel shower fixtures are made by a company that until recently, was Canadian-owned.
Their products are carried by Ottawa plumbing showrooms, which means you can see and handle the actual components before the project starts — the shower head, the valve trim, the handle — not just a photo of them. You’re able to be certain that this product is one that you won’t regret selecting.
The internal components are brass and ceramic. Thermostatic systems include anti-scald protection calibrated to a temperature limit dial.
Two-function and three-function shower systems are configured during installation and tested for pressure balance, flow, and leak-free connections before the walls are tiled.
In every installation, the rough-in valve is installed and pressure-tested at this stage (before the backer board and tiles are installed. The trim kit, handle, shower head all go on after tiling is complete.
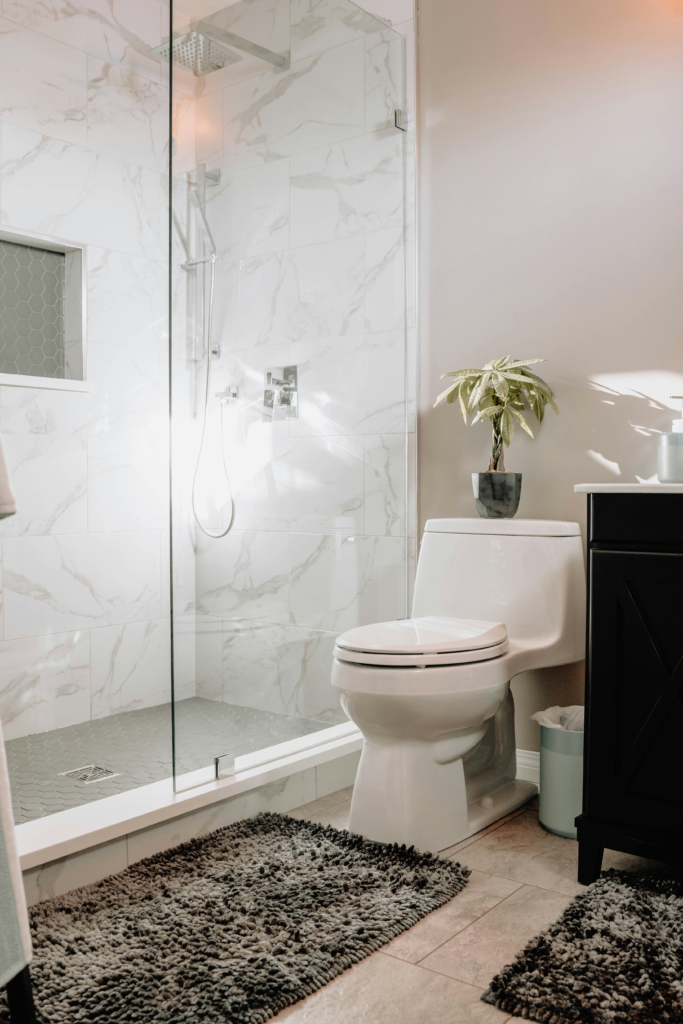
Tile Installation
In our process, tile selection is entirely your decision.
We provide a list of local Ottawa suppliers, the exact square footage needed for walls and floor with a waste factor built in, and guidance on trim tile, grout colour, and edge trim finishing. You visit a showroom, make your selections, buy the tile and matching grout, and we coordinate pickup.
We install your tile over the waterproofed substrate using setting materials appropriate for the tile type. Large-format tile (anything above 12×24 or similar) requires back-buttering and specific trowel geometry. Porcelain and natural stone require different adhesives than standard ceramic. These are not details we improvise on site. With the correct adhesives and techniques, these tiles won’t be giving up for decades- the longevity of tiles over the right substrate with the right adhesives is beyond dispute, by this point.
Grout is applied after tiles are fully set. Grout colour matters — it affects maintenance requirements, long-term appearance, and how forgiving the surface is to minor variation in joint width. We’ll raise a concern if a combination is headed toward a design problem. An example that best demonstrates this might be a very dark tile (mosaic, for example) with a very light grout, which might appear overly busy, to the point where it could make a person feel dizzy just by looking at the tiles. A lighter grout can also look discolored sooner than a darker one.
A tiled shower is field-repairable. If a tile is damaged — cracked by impact, stained beyond cleaning (hard to imagine, given the quality of the glazes on tiles these days) — a tile can be removed and replaced without touching the rest of the installation. There is no equivalent repair option for a cracked or stained plastic panel.
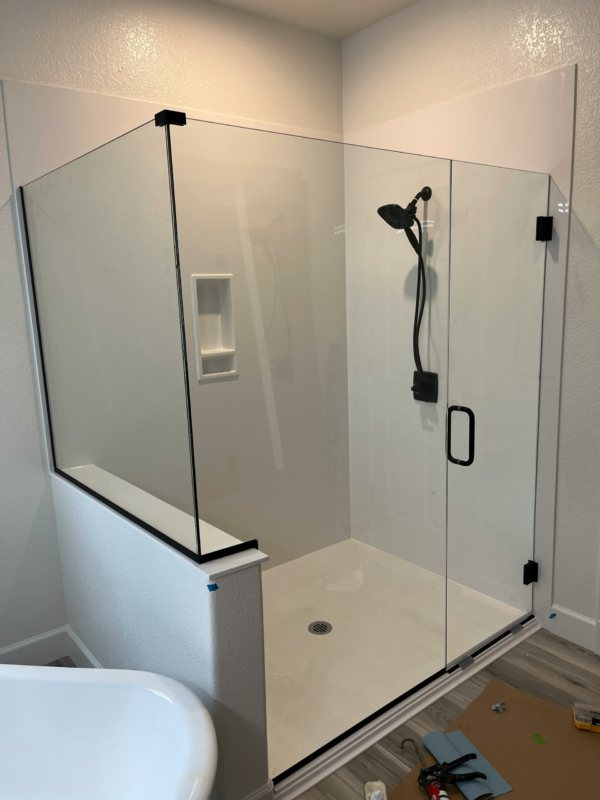
Fixture Trim, Door, and Accessories
After the tile is grouted, all cover plates, valve trim, and shower head assemblies are installed and tested. Doors are hung and adjusted. Caulking is applied to the corners and edges.
Fleurco and Neptune doors use tempered safety glass and chromed brass (in some cases) hardware — not plastic components. Installation starts with verifying that the rough opening is plumb and square relative to the base. Track systems are set level. Panels are adjusted for even gaps and smooth operation before seal strips are installed.
If you’ve ordered a grab bar, it’s anchored into wall blocking that was installed during the rough-in phase — not into drywall, not into tile alone. Blocking is positioned based on where the grab bar needs to be functionally, not where a stud happens to land. We use Grab Bars Canada products, among others, for shower safety items.
Fold-down shower seats (Healthcraft Serena Seat or the ABS folding option) require the same blocking consideration. They’re load-bearing items. The anchoring reflects that.
Shampoo niches are built into the wall cavity, waterproofed as part of the membrane system, tiled to match the surround, and trimmed. They’re not surface-mounted. They’re part of the wall.
If you’ve ordered a heated floor (Schluter DITRA-HEAT), the heat cable is embedded in the floor substrate before tile goes down. This requires a dedicated 15–20A GFCI electrical circuit arranged in advance by an electrician. It cannot be retrofitted after tiling is complete. During the rough-in stage the electrical outlet can be installed and connected to the heating thermostat (and system).
Completion and Walk-Through
When production is completed, the entire space gets cleaned. We walk through the completed renovation with you: how the fixture system operates, how the door opens and closes, what the maintenance requirements are for grout and glass, where the grab bars are rated to, how the seat folds.
We take after photos for our own records.
If anything isn’t right, we address it before we leave.
It’s the part of the process in which details or other issues can be brought up, addressed and made right, should there be a need.
Part of our completion process is to apply an automated outreach to all of our clients 30 days after completion of work. If they’ve experienced any issues after the production is complete, we have an opportunity to address it right away.
The materials and the process don’t leave room for slow-developing installation errors. An issue will present itself early, or most likely not at all.